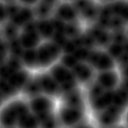
| Making Cellular Textures |
|
|
|
|
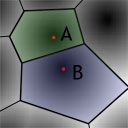 |
This image gives a closer look at what's going on in that first texture. Here I've tinted all the pixels closest to point A green and all those closest to point B blue. Notice that they form cool "cellular" regions. Within a region, pixels closer to the center are darker while those farther away are brighter. Conceptually, all you need to do to create this one is set the color of each pixel proportional to the squared distance to its nearest point. |
Making the Texture
It's hard to predict the range of distances ahead of time, so what we'll do
first is fill out a temporary distance buffer with the same dimensions as the texture we
want to generate. Then in a second pass we can go through each pixel, grab the
appropriate distance from the buffer, and use its normalized value to
generate the color for that pixel. Here's the pseudocode to do this:
float distBuffer[width*height];
float xcoords[numPoints];
float ycoords[numPoints];
float mindist = infinity;
float maxdist = 0;

for each point i
    xcoord(i) = random number between 0 and width
    ycoord(i) = random number between 0 and height

for each pixel x,y
    distBuffer(x,y) = distance to nearest point
    if distance < mindist then mindist = distance
    if distance > maxdist then maxdist = distance


for each pixel x,y
    color(x,y) = (distBuffer(x,y)-mindist)/(maxdist-mindist)
|
Finding the distance to the nearest point can be done by simply iterating over the entire points array, calculating the distance to each, and remembering only the smallest. Doing this for every pixel is very expensive, but I'll show you one way of optimizing it later.
function DistToNearestPoint(x,y, xcoords, ycoords)
    mindist = infinity
    for each point i
        dist = sqrt( (xcoords(i)-x)^2 + (ycoords(i)-y)^2 )
        if dist < mindist then mindist = dist
    return mindist
|
Here are the specifics for the four textures I showed at the top of the page:
 |
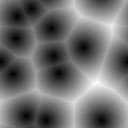
This is the simplest version. As I mentioned earlier the color
for each pixel is simply the squared distance to the nearest point.
So for each pixel: distBuffer(x,y) = dist*dist
|
 |
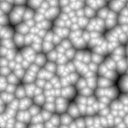
This one is exacly the same as the previous except each pixel is
inverted.
So for each pixel: color(x,y) = 1-color(x,y)
|
 |
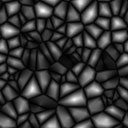
For this texture, we need the distance to the nearest two points.
Then for each pixel:
distBuffer(x,y) = dist2-dist1
|
 |
Here we also find the nearest two points, but then multiply their distances.
distBuffer(x,y) = dist1*dist2
|
Making It Tile
Making these textures tile is simple. The key is to modify the
distance calculation so that it wraps points around the image boundary if that
will make them closer.
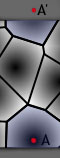 |
In this example, even though A is at the very bottom of the image, we want it
to be treated as the closest point to the highlighted pixels at the top. What we do is
pretend that A is where A' is when this will make it closer to a pixel.
The distance function then becomes:
|
Making It Fast
The algorithm above calculates the distance to every point
from every pixel... this is really slow! To speed it up you just have to
toss all the points into your favorite spatial-sorting data structure and
modify DistToNearestPoint to use it.
The data structure that I use for this is kind of like the 2D bastard son of a sphere-tree and a bsp-tree. I'll just give a quick overview of it here.
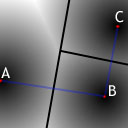
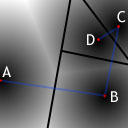
As you can see in the pictures below, every time you add a point to the data structure you figure out what node the point should go in and divide that node in half along the line separating the original point of the node and the one you're adding. At each split while traversing the tree, you recurse to the side with the point closer to the point you're adding. For example, when adding point C we check the distance from C to A and from C to B. We find that C is closer to B so we recurse down the right side of the split.
 |
 |
 |
 |
|||
|
||||||
Once all the points have been added, we walk through the tree and calculate the bounding circle for each node. The center of that circle is just the initial point for the node and the radius is the distance from the center to the farthest child point.
Now that we have the data structure built, finding the nearest point to a pixel is incredibly fast. What we'll do is represent our search with a circle centered at the current pixel and with radius equal to the distance to the nearest point we've found so far. For the first pixel, start the search radius with the distance to one of the points at random. For every other pixel start with the radius set to the distance from this pixel to the point that was closest to the last pixel.
With our search in this form we can quickly cull large parts of the tree by testing for overlap between our search circle and a node's bounding circle. If there's no overlap, you don't have to recurse to that side. Let's take a look at this search already in progress:
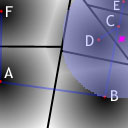 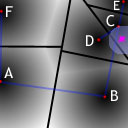 |
Okay, pretend that goofy purple splat is the pixel we're searching for the nearest point to and the light blue area is our 'search circle.' It starts off big, but once we hit the node split by B and C we see that C is closer to our pixel than B and that C is actually the clostest point we've found so far so we shrink our search circle to just cover C and continue. |
Alright, you should have the gist of it by now. If not go read up on trees, bsp-trees, kd-trees, sphere-trees, etc. This text was on cellular textures remember? :)
Final Thoughts
You can put cellular textures to work
in all sorts of things. They make good web page backgrounds, bump maps,
funky spider webs, and of course lava textures.
So now it's time for you to bust open
your development environment and get coding. If you come up with any cool variants,
or if you have any questions or comments, feel free send me an email at jimscott@blackpawn.com.