

| Tunnel Effect |
|
|
|
|
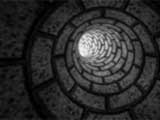
Tunnels rule. There's nothing else like flying at high speeds through constantly-twisting never-ending passages with fast music blaring in the background. This text will show you how to create just such a tunnel - though the music you experience it with is entirely up to you. :)
There are a couple fundamental ways of approaching movement through the tunnel:


The last option may seem the least intuitive, but as it turns out it's the simplest to implement and also the hardware friendliest, so it's the approach we'll use.
We place the camera at the origin facing down the positive z axis. The tunnel
gets divided into N rings evenly
distributed along the z axis out to the tunnel length L.
Given this setup, the z coordinate of ring n is: 
We also need to define a function to specify the path of the tunnel. This
function should take the z coordinate of a ring and return the ring's position
in the xy-plane. For a simple corkscrew we can use:
    function CorkScrewRingPos(z : float) returns float2
    {
        x = cos(2 * Pi * z / L)
        y = sin(2 * Pi * z / L)
        return float2(x,y)
    }
|

|

|
To simulate the camera's motion through the tunnel, we need to change the position of the tunnel's rings over time. Doing this is very simple. All we do is offset the z coordinate that we pass into our RingPosition function by the distance the camera should appear to have moved since the animation started.
function UpdateRings(time : float)
{
    foreach Ring
    {
        (x,y) = CorkScrewRingPos(ring.z + time * cameraVelocity)
        foreach Vertex in ring
            offset vertex by (x,y)
    }
}
We also need to update the camera's position in the XY-plane so that it stays inside the tunnel. The simplest approach to this is to keep the camera centered within the ring at z = 0.
CameraPos.xy = CorkScrewRingPos(0 + time * cameraVelocity)
This gives us the basic tunnel effect:
Pretty bland with just wireframe rings of course, so connect them up with triangles and slap a texture on it. To complete the effect, the texture coordinates need to be updated along with the ring position so that you can't tell the rings aren't really moving. While updating vertex positions, just shift the v texture coordinate proportional to time elapsed and camera speed.
Conveniently enough, everything we've done above can be performed directly by the GPU.
struct Vertex {
    float3 pos : POSITION;
    float2 uv  : TEXCOORD0;
};

float4x4 Transform;
float    Time;
float    TunnelLength;
float    CamVelZ;

Vertex main (const Vertex v) {
    Vertex o = (Vertex)0;

    // position of vertex
    float4 pos = float4(v.pos, 1.0);

    // figure out how much to offset this vertex in xy-plane
    float2 ofs = CorkScrewRingPos(pos.z + Time * CamVelZ);

    // offset the vertex
    pos += float4(ofs.x, ofs.y, 0, 0);

    // transform position
    o.pos = mul(pos, Transform);

    // copy texture coordinates
    o.uv = v.uv;

    // shift v
    o.uv.y += (Time * CamVelZ / TunnelLength)%1;

    return o;
}
There are tons of ways you can tweak your tunnel to get the look you want. Here are some ideas to get you started:
Want to see it in action? Watch the first part of MDMA or the end of Despair.

